WordPress is a platform for rapidly creating and maintaining websites. Users ranging from beginners to experts can tailor the software for their specific needs. WordPress at its root is a content management system which can be extended by thousands of plugins for use by websites with minor content changes, blogs, small-scale web applications and more.
Setting Up A WordPress Infrastructure
In this post, I am going to discuss setting up an infrastructure used for many websites. However, I’ll focus more on the development of web applications on personally maintained servers. When creating a website, there are a lot of decisions that need to be made to lay the foundation for the site.
- Will the site be mostly informational?
- Will there be user interactions?
- How often will the content be updated?
- Who will be updating the content?
The list of questions grows based on the complexity of the site. Answers to these questions lead to determining the right tool for the right job.
Application Environments
Before downloading the latest version of WordPress lets go over the application’s environments. We will want three different types of environments:
- Development
- User Acceptance Testing
- Production
Having a nice, clean, easy to maintain environment structure ensures a smoother transition when you are ready to pass the torch to another developer or bring someone else on the project. This will also allow for active development and testing while not interfering with the public facing site.
Open Source Tools
Open source tools allow for easier configuration, improved folder structure and more automation that will help you manage your WordPress projects.
Bedrock by Roots
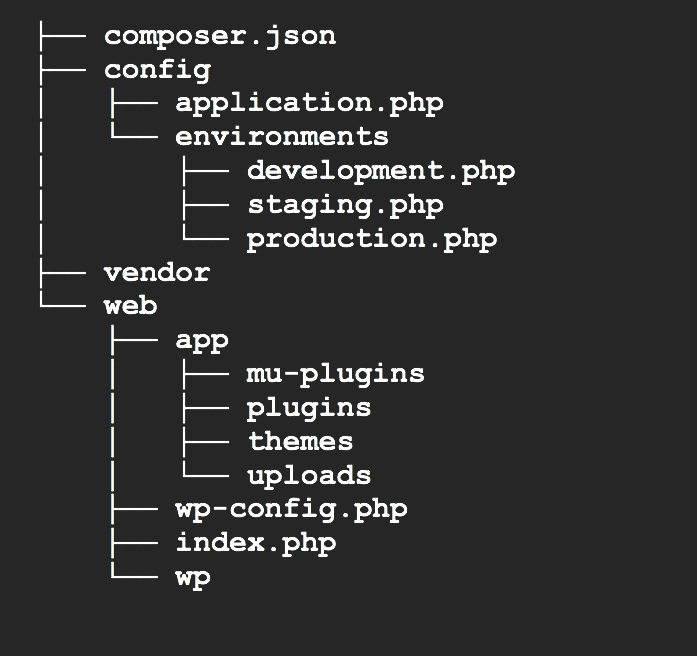
Rather than doing a standard WordPress install, we can save some time by using Bedrock by Roots; a boilerplate that uses the standard WordPress install and provides a better folder structure to accommodate our different environments.

As you can see, we already have three config files setup for our environments where we can put all configurations specific to that environment (note: staging is our user acceptance testing environment). General application configurations go into config/application.php keeping the environment files clean.
Install Composer
You may have noticed there is a composer.json in the root of the directory. Composer is needed to install and update Bedrock. We can also use Composer to install and update plugins we plan on using. That’s right, no more downloading the plugin update and moving it to the plugins folder (note: custom plugins not available on composer will still require a manual process).
Create A Project
Your server will need PHP 5.6 or greater and Composer installed on the machine. Let’s start by creating the project:

And now we’ll copy the .env file:

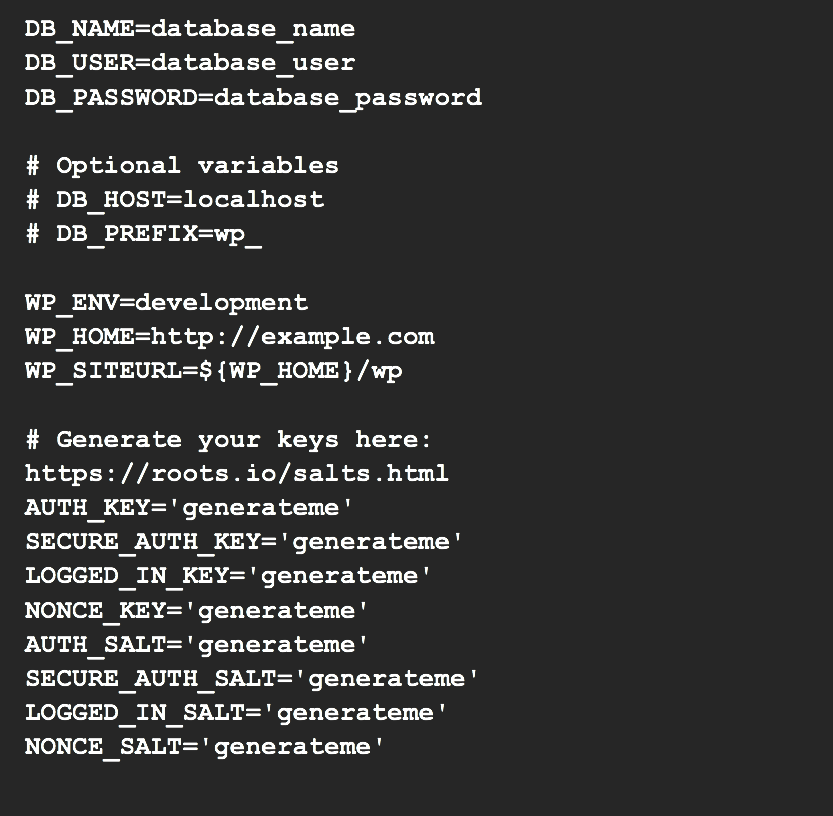
We’ll need to fill in our .env file:

Add Themes
Now we need to add our favorite theme to web/app/themes folder. If you are looking for a bare-bones theme that has all the development tools you would need, check out Sage by Roots. For now, we’ll pretend we downloaded a theme and had it unzipped in our home directory.
Configure Web Server
Our last step is to configure our web server config file root to:
![]()
With that, we now have our site up and running and can access our site’s admin portal at http://test-site.com/wp/wp-admin. For more detailed instructions check out Bedrock’s documentation.
Create A Solid Foundation For Your WordPress
The WordPress standard install can be messy, harder to maintain and challenging to accommodate different environments. By using Bedrock with Composer we’re able to manage our dependencies, add environment dependent config files, and organize our file structure in a way that follows web standards while laying a good foundation for our application.
